food

“Ow, you’re squishing me!” Bento

IMG_9186

What is it about kids that they are programmed to be picky eaters? My daughter dislikes egg yolks, milk, chicken, and carrots. My son dislikes everything except doughnuts and ramen.

One trick that I use to make them eat better is the Do As I Say rule. Usually, this involves telling them the story of how the Pharaoh was cursed by God with 10 plagues because he kept on disobeying.

But, I want the kids to have pleasant memories of mealtimes. They should have a positive relationship with food. Not associate it with rivers of blood.

So I make these little bento lunches. It’s cute so they’re interested. My daughter makes up a whole scenario where the faces are going to a party inside her tummy. My son roars like a dinosaur sometimes; other times he makes up dialogue like, “please don’t eat me.” Then he gobbles them up.

For this, I just shaped rice into balls and added nori for the eyes. I have a puncher to make it easier, although scissors work just as well. The rice comes with humba, a vinegar and soy sauce pork stew, and sauteed vegetables.

It’s not as complicated as it looks, but it does take some time to assemble. Say, 30 minutes? But, it sure beats having to make angry faces just to make the kids finish their lunch.


food

Puppy Bento

dogbento

Quick bento of rice, vegetables, and some beef patties for dog ears.

food

Bento Snacks for Beginners

My daughter is a good eater, but very picky. She loves eggs, but only the white parts. She’ll eat rice, but won’t touch the meat.

She only likes the bread part of sandwiches. Just hand her a piece of bread, you say. Easy.

Uh, no. She insists that I make her a sandwich and then watch as I pick it apart and just hand her slices of bread.

To further complicate things, these quirks are highly dependent on her mood. There would be times when she must absolutely, desperately have meat. No rice.

She’s three so she has complicated feelings, okay?

Last week, my daughter had assessments so she had to bring snacks to school. I was a little nervous since the last time I had to do this, she came back with a note saying that she refused to eat and that we should do a better job packing her food.

This time around, I was determined to redeem myself.

I got her a new container, so issue two was solved easily. As for the mystery of whether or not she would eat them, I decided to outsmart her by using an appeal to cuteness.

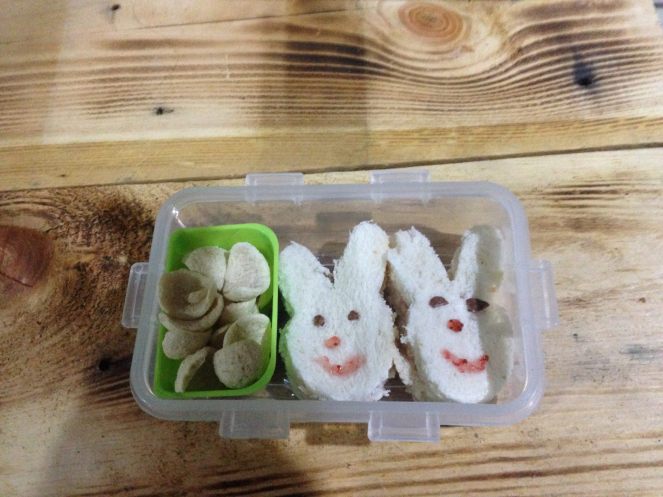
On day 1, she got butter and strawberry jam sandwiches and some cereal. I just used a cookie cutter to make bunny shapes. The eyes are chocolate cereal crumbs, and I drew on the noses and smiles with jam.

bunnybento

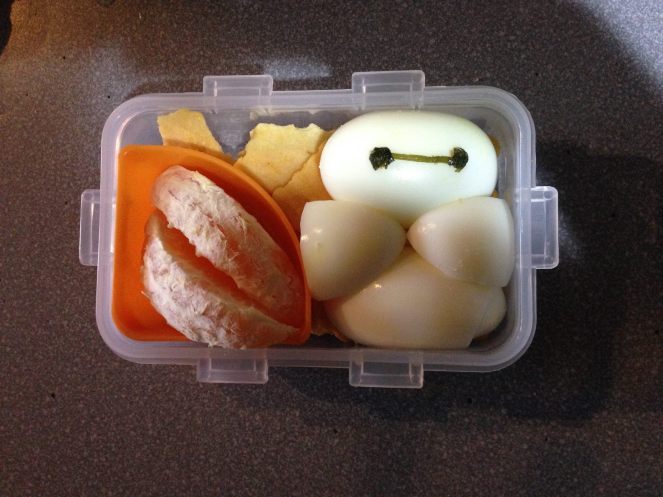
On Day 2, she got a hard boiled egg sliced to make a very crude looking Baymax. The eyes are just balled up pieces of herbs (this was cilantro, I think), from dinner the night before. Baymax was on a bed of cheese crackers. She also got a few orange segments.

This was a bit of a failure, because the egg made the crackers into a soggy mess. I would separate them next time.

baymaxbento

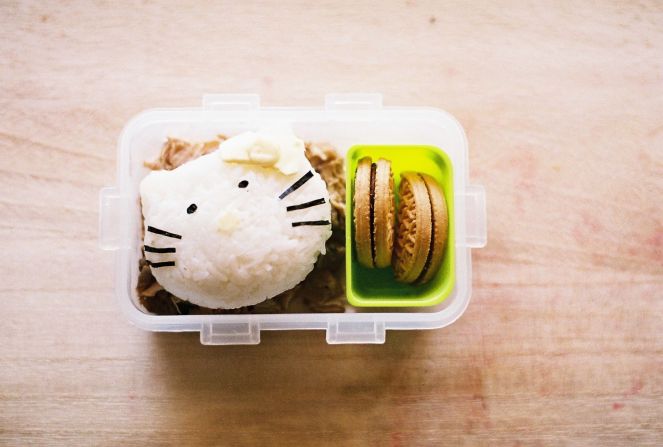
I saved the big guns for the last day: a rice ball shaped like Hello Kitty, her favorite character. You can buy rice molds in every shape imaginable, but I just used plastic wrap. I put the rice on some Saran and shaped it like the cat’s head. The plastic kept the rice from sticking to fingers and made it easier to pack in the grains tightly so they’ll keep their shape.

The whiskers and the eyes are cut up pieces of nori, and the bow and nose are cheese slices. She ate the rice with shredded up adobo and had a cookie for dessert.

hkbento.jpg

Making these were surprisingly therapeutic.

In my mind, I’m one of those crafty, Pinterest moms. It was nice to do something creative with what should have been a routine chore. Even better, my daughter was excited to eat her snacks and came home with cleaned out containers each time. They took only about 10 minutes longer to prepare, so I got maximum rewards for my input. I’m marking these up as a parenting win.


food

A is for Applesauce, B is for Bacon

Images via Tommy Perez’s Instagram

Talk about playing with your food. Designer Tommy Perez, taught his daughter, Zoe, the alphabet through her favorite treats. In a project called A to Zoe, he doesn’t just use the food as examples for the letter sounds, but uses them to demonstrate the appearance of the letters themselves.

Me and my haphazardly printed out letter flashcards for my daughter’s ABC lessons are ashamed.

food

Day 211: Beet Cake

Our kitchen will never produce something this pretty. Whenever I bake something, it always feels like the kitchen exploded in a cloud of flour and sugar.

food

Day 200: Carla vs. Gabi

Sinigang was on the menu last night. But before I could enjoy the sour, salty deliciousness that was this soup, I had to contend with the unexpected fight that the gabi (taro) put up before it allowed itself to be dropped into the pot.

So there I was, happily peeling the skin off the taro roots, when I felt a minor itch on my right hand. A tiny red mark had appeared. I thought nothing of it, and continued to peel.

Approximately 10 minutes later, the itching worsened. It felt like a bazillion little monsters were scratching my skin with their mutant chicken claws.

While breathing fire.

I tried washing my hands, but it was still super itchy. The tiny red spot grew to be about an inch in diameter. With the obvious deterioration of my condition, I did the only logical thing:

From what I read, it turns out that gabi contains calcium oxalate, which is poisonous when raw*. Wait, what? If it has poison, why are we eating it?

And please, for the sake of all that should not itch, what can be done to get rid of the itchiness? Someone posted in a forum that tamarind breaks down the crystals of the calcium oxalate to render it harmless.

Since I used a sinigang mix, I did not have any tamarind around. I thought maybe the mix might work too. It should have some tamarind in it, right? I rubbed some on my hands. It didn’t work. Then I thought maybe it is the acidity in the tamarind that breaks down the toxins. I had some calamansi in the ref, so I tried those as a substitute. Didn’t work either.

Finally, I just resorted to washing my hands as thoroughly as possible. About five times. Eventually, the itchiness went away and the redness subsided. I’m not sure what helped. Maybe it was just time and  time really does heal all wounds.

After my hands felt better and I cooked the sinigang, I made sure to eat the gabi that attacked me.

*Cooking breaks down the toxins so gabi eaters, do not fret. Just stay away from raw gabi and all is well.

food

Day 143

One of the running jokes between my husband and I is the correct way to cook rice. My grandmother taught me that to measure the amount of water that goes into the rice, use the tip of your middle finger.

You know how each finger has lines that divide the it into segments? (Three, usually although I have a friend who has four segments. She has very long fingers.) The first line from the tip will show you the exact water to rice ratio needed. Rest the tip of your middle finger on the rice and make sure that the water reaches the first line, submerging the top segment of the finger in water.

This will yield in perfectly cooked rice every time. I promise. Now, when I first told my then-boyfriend/now-husband about this, he scoffed at the idea.

When I told him that the method has never failed before so empirical data shows that it works, he laughed. It has never happened before, therefore it will never happen?

But ever since we got married, he’s seen how accurate fingers can be. Our rice always comes out awesome. Now, he makes use of the same method too. He’s been going around saying our grandkids will make fun of him for his initial disbelief at my rice-making technique.

So, are we the only ones who makes use of our fingers to measure out the water? How do you cook your rice? 🙂

food

Day 102

After a hiatus from blogging, I am back with a vengeance. Or at least, a good dinner idea.

Work and everyday existence is the ultimate energy-zapper. The past couple of weeks, I’ve been trudging around mechanically: answering emails-doing laundry-heading off to events-sleeping. On some nights, I barely had the energy toss my bag on the sofa. I sleep with my work clothes still on, teeth unbrushed, and shoes kicked off as my husband looks on, aghast. I guess it’s safe to say that the honeymoon haze has been lifted.

I would love to say that I’m a little peppy, beacon of sunshine but the truth is my personality has always been on the acerbic side. Especially when I’m sleepy. My husband affectionately calls me a grump. But, I am happy to say that I have redeemed myself a little bit with dinner the other night.

Sorry for the bad phone camera shot

Porkchops with Caramelized Onions

What You Need

1/2 kilo porkchops

1/2 cup soy sauce

3 tbs. sugar

vinegar

salt

pepper

3 whole onions

olive oil

vegetable oil

Dissolve the sugar in soy sauce. Add vinegar, salt, and pepper to taste. Marinade the pork chops for at least two hours. Fry in vegetable oil.

For the caramelized onions, add some olive oil to a pan under medium high heat. Add the onions. I used red onions but I think white or yellow ones would be better. Once the onions are translucent, bring down the heat to the lowest possible setting. Cook it down until it starts to look soft and caramelized. It usually takes about 30 minutes. It may seem like a long time spent to cook onions but they are the best, I swear.

Zucchini and cherry tomatoes

What you need:

Two whole zucchinis, diced

A package of cherry tomatoes

olive oil

salt

Steam the zucchinis and tomatoes. It’s best when they are barely cooked. The center of the zucchini (don’t peel them!) should still be firm. It takes about five minutes. After, add some olive oil and season with a little bit of salt.

This is the simplest, most amazing side dish ever. The zucchinis are mildly sweet and then when you bite into a whole tomato, it pops in a burst of tangy goodness. So fun to eat.

food

Day 69

In our quest to become choose healthy when it comes to eating, we have welcomed bell pepper wraps into our rotation.

bell pepper stir fry wraps

easy peasy dinner

What you need:

4 pieces bell peppers, seeded and cut into strips

1/4 kilo ground beef

2 tablespoons oyster sauce

whole wheat tortillas

shredded lettuce

Onions

Procedure:

Cook the ground beef in a little bit of olive oil. Drain the excess fat and add the bell peppers. Add the oyster sauce and season with salt and pepper to taste. Let it simmer a bit until the bell peppers are cooked. Heat up the tortillas and assemble. We topped ours with the shredded lettuce and caramelized onions.


food

Day 48

Dinner over the past two days has taken on some form of a theme. The other night, it was lemons. Last night, honey was the star at the dinner table.

I wanted to make beef pares ever since I encountered this article on Spot.ph. I’ve actually never had pares before, which is a sticky situation when you’re cooking something. I just followed the recipe here although I did substitute the beef with chicken (just because I wanted to finish up the chicken before buying any more meats) and the sugar with honey.

I suggest to skim the fat off while the chicken simmers so it would not be too oily. I also separated some of the broth before I thickened the sauce to make a soup. Paired with garlic rice topped with caramelized onions (makes a world of difference instead of just frying the onions with the rice and garlic), it seemed like a pretty decent interpretation of beef pares. I still have no idea what pares is supposed to taste like but dinner was pretty good.

it tastes a lot better than it looks, i promise.

I also wanted to make some kind of dessert. My sweet tooth has been neglected recently. I encountered a recipe for tapioca pudding on Heart of Light (I love you, Rachel!) and it looked amazing. It was perfect because it does not require the use of an oven, which I currently do not have and it lets me use up our overflow of tapioca (sago, for the rest of us).

I followed the recipe, with the addition of a little bit of chocolate powder  and it turned out to be a huge, blobby mess. The tapioca disintegrated into mush. My theory is that the tapioca sold here does not require any soaking. After all, the instructions in the package said to just dump the contents in boiling water.

With the first version rejected, I made a second batch using honey as a flavoring. I tweaked an old custard recipe and it turned out to be just what my sweet tooth ordered.

honey tapioca pudding

Honey Tapioca Pudding (makes four servings — two, if you like sweets)

What you need:

1/4 cup of honey

1/4 cup of tapioca

1/4 cup of cornstarch

1 egg yolk

1 cup of milk

1 tablespoon of butter

Procedure:

Cook the tapioca in boiling water until it becomes fully transparent. Stir it occasionally to prevent sticking. Drain the tapioca and let it cool once it is cooked. Dissolve the cornstarch in the milk and bring to a boil. Put in the honey — you can add more or less depending on how sweet you want it. When the mixture starts to thicken, add the beaten egg yolk. It helps to temper the egg by adding a little bit of the hot mixture into the egg before putting it back in. This prevents the egg from being scrambled. When the mixture starts to look like custard, take it off the heat and put the butter in. Fold in the tapioca and chill before serving.

If I had shot glasses, I would have served these up in them for better presentation. In this reality, I just ended up spooning the pudding in juice glasses.